Single Tooth Abutment
The single tooth abutment is based upon a non-rotational component which fits directly to the hexagonal head of an osseointegrated implant fixture. This component eliminates the trans-epithelial connector, while using the abutment screw for final fixation. The component is augmented with impression copings that fit the hex of the implant and fixture replicas with the hex portion that is reproduced to maintain the spacial relationships of the components during fabrication.
Inter-occlusal space often plays a major part in the selection of abutments. The most adaptable and versatile abutment for very restricted working areas is the cast able plastic UCLA abutment made by 3-1 Company. Using this component, the technician can create many important changes in design which overcome difficult challenges in esthetics. The correct casting procedures and metal finishing techniques are critical factors in the success of this restoration (Figures 6-4,5,6). The integrity of the internal hex lock portion of this casting must be perfectly maintained. The Branemark System single tooth abutment is a non-rotational titanium component that precisely engages the titanium osseointegrated implant fixture. This maintains the ideal harmony of a titanium interface. This abutment is available in five different tissue depths (Figure 6-15) and offers the option of a cement able sleeve or a direct cast restoration.
Gold alloy single tooth cylinders from the 3-1 Company (Figure 6-3) have a machined hex lock that exhibits an excellent predictable fit to the hexagonal fixture. Two abutment screws are included with the cylinder: the actual fixation screw; and a long laboratory screw that is useful in forming the substructure pattern as well as the access hole. Careful investing and casting procedures do not adversely affect the fit of this component.
Bdinemark System hex lock gold cylinders are supported by a special hexagonal titanium abutment and abutment screw. This cylinder is secured by a small gold screw, thus preserving the original design feature of the weak link being the prosthetic gold screw. A regular laboratory guide pin is used for fabrication techniques (Figures 6-54 and 655).
Another type of single tooth abutment from Core-Vent features a titanium cementable post or a plastic cast able post pattern. Working from a master cast containing a fixture replica, the post pattern is seated firmly in place. Either post can be modified to create the unique dimensions required for each different application. For complete adaptability, the castable post is more versatile. The finished implant-supported post abutment is then cemented and an impression taken. The new master cast is very similar to a Pindex crown and bridge format. The single tooth restoration is fabricated using the pattern material, metal alloy, and veneer material of choice. The completed crown is now cemented to the implant post abutment.
The Branemark System angulated abutment gold cylinder can also be used in special single tooth situations. The screw-retained cylinder is altered (Figures 6-38 and 6-39). to create a fixed screw post design. The definitive crown is then built on traditional crown and bridge principles and cemented over the fixed screw post abutment.
The UCLA Abutment
A master cast with fixture replica (3-1 Co., #ILA2O) in place. Soft material (Coltene G-mask, Coltene, Inc.) is applied to the area surrounding the implant to simulate the soft tissue response.

A lingual view shows the height of the tissue labial to the fixture replica. To duplicate the correct sagittal profile of the tooth, this area must be treated with great care in both metal design and ceramic crown contour.

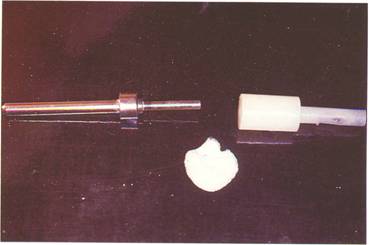
Components include at top: abutment screw with gold UCLA hex lock abutment (3-1 Co., GUCA 1), abutment screw and castable hex lock UCLA abutment (3-1 Co., UCLA Bl) and Bnlnemark System fixture.
Crown and bridge wax is added to the adjusted UCLA pattern to form the desired substructure contours. The pattern is sprued and invested in a high heat phosphorous investment (Ceramigold II, Whip Mix Corp). The ring is burned out and cast in a high noble ceramic alloy (Eclipse, J. M. Ney Co.).

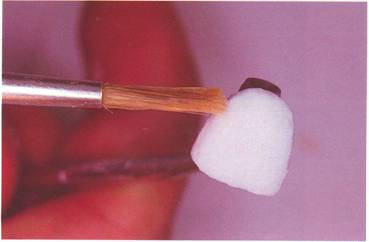
The lapping mandril, diamond paste, and the centering sleeve are shown here. The cast abutment pattern must be finished prior to veneer application with this system. The mandril is placed in an ordinary handpiece, with the casting being held to the smaller end with the centering sleeve. The paste is applied to the flat surface of the mandril and ground against the margin of the casting. This creates a milled interface surface which contacts the implant with greater accuracy.

The metal substructure is shown fastened to the titanium implant fixture. This technique enables the technician to verify the marginal fit of the casting.
This lingual view shows the casting when seated on the fixture replica. Note the good cervical contour and sufficient incisal support.

The metal pattern after degassing and opaque application. The internal portion of the abutment must be cleaned of all porcelain particles before firing.

The body and incisal porcelain powders are built up on the model. Labial and incisal length contours are over-built to allow for condensing and shrinkage (Figures' 6-9 and 6-10).


The abutment crown is removed and final porcelain additions are completed.

The porcelain as it appears after the first bake.
Final glazing and polishing are complete. The restoration allows for natural tooth characteristics without compromising the desired esthetics.
